Showing posts with label Combining Art and Literature. Show all posts

Monday, October 8, 2012

Pumpkin Painting Ideas


Who says you can't incorporate a little pumpkin decorating into your academic work?

A few ideas for combining pumpkin fun and learning -----


  • Literary Pumpkins (literature) - Create characters from a story, like Humpty Dumpty, or this familiar set of friends.


  • Planets (science) - Do you have quite a few pumpkins? A whole solar system could be made with them.  Want to be even more technical, try to coordinate sizes.  Make the largest pumpkin Jupiter and a smaller one Mercury.
  • Globe (geography) - Just want to paint one planet?  Why not try to draw the rough outlines of the continents and paint one pumpkin to resemble the earth.
  • Georgia O'Keeffe style flowers (art) - Are you currently studying a particular artist?  Earlier this year, we learned about Georgia O'Keeffe and her large scale paintings.  When it came time to paint pumpkins this year, we simply turned a pumpkin over and painted one large scale flower similar to her painting style.


  • Flags (geography) - Are you studying a particular country?  Perhaps you could paint a landmark or the country's flag on your pumpkin.
  • People, Events, or Inventions from the Past (history) - Studying the American Civil War this year could lead to a painting or carving of Abe Lincoln on your pumpkin.
  • Animals (science) - Does your child have a favorite animal?  Perhaps he would like to use his pumpkin to make one.  My youngest son is planning how to make a bat out of a pumpkin.  He has decided he will add black construction paper wings to the pumpkin.
  • Patterns and Shapes (math) - Perhaps you would rather try something more basic.  How about painting a pattern of stripes or simple shapes?


Two Preschool Pumpkin Painting Tips -----

  1. Encourage your preschooler to coat an entire pumpkin with glue using a foam brush.  Then, sprinkle glitter over the wet glue.  Allow it to dry completely. 
  2. Securely tape a simple stencil or shape, i.e. a leaf shape, onto the pumpkin.  Ask your preschooler to paint over it all.  Allow the paint to dry and remove the shape to reveal the design.


Ideas for Before and After Painting Pumpkins ------


Before you paint, decorate, or carve your pumpkin, use it in your math and science lessons.  Measure the weight and girth of each pumpkin.  Conduct comparisons.  Observe your pumpkins in their natural state.  Are their many differences?

After, when the pumpkin starts to waste away, because they will, try using them for further lessons.  Cut them open and see what was inside them.  Or host your own "Pumpkin Chunkin" contest.  Encourage your children to build their own catapults or pumpkin launchers and hold a contest to see which machine can launch the pumpkins the farthest.


Looking for other ways to incorporate pumpkins into your homeschool days?  Perhaps a look through In a Pumpkin Shell, by Jennifer Storey Gillis, will offer you a few ideas.

Or, perhaps you'd rather just cuddle up with your child and enjoy reading a few pumpkin books?  Then this listing compiled last autumn by Beth will help you find a few good ones to share.


Thursday, September 20, 2012

Connecting Reading and Art for Preschoolers

In our house, we do a lot of art projects and we love to do art projects that go along with the books that we read.  In fact, we host a weekly playgroup where I read a story and then the  children do an art project that goes with the story.  Sometimes, I am really ambitious and even make a snack to go along with the theme.  Today, I want to share with you a few ideas for simple art projects to do after popular children's stories.  This is not a comprehensive list, but hopefully these ideas will get you think about simple projects that you can do with your preschooler after reading a story.

After reading Chicka Chicka Boom Boom, you can make a toilet tissue tree and decorate it with letter stickers.  For a snack, I made homemade bread in the shapes of the children's initials-they loved their snacks!


When we read Sheep in a Jeep, we made handprint sheep 


and enjoyed a marshmallow sheep snack.


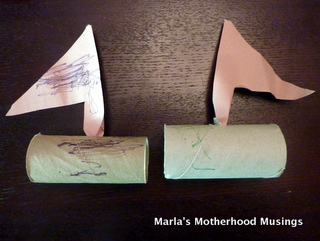
We read Scuffy the Tugboat and made boats. For snack, the children enjoyed "boats" made from orange slices, celery sticks, and grapes (sorry, but I can't find a photo of the snack).


We read Where the Wild Things Are and made crowns so that we could be the "Queens of the Wild Things".


We have also planted carrot seeds after reading The Carrot Seed, made coffee filter butterflies to go with The Very Hungry Caterpillar, baked cookies after reading If You Give a Mouse a Cookie, and made paper plate trees after reading The Giving Tree.

How have you connected reading and art for your children?

Today, we are linked up at It's Playtime.

Friday, June 22, 2012

"Chicka Chicka Boom Boom" Playgroup

In our homeschool, story-based lessons are some of our favorites.  We love reading books and doing activities related to the story!

Recently, my girls and I have started hosting a weekly storytime playgroup to share our love of reading.  Each week, a group of toddlers and preschoolers comes to our house for a story, art project, and snack.  This week, our playgroup focused on Chicka Chicka Boom Boom by Bill Martin Jr.

We started our playgroup by singing the alphabet.

Then, we read the story and sang that alphabet again.

Next, we made our own alphabet trees using toilet tissue rolls and alphabet stickers.  All of the children in the playgroup love stickers, so this activity was a real hit!


We concluded our playgroup with a little snack.  I made bread in the shape of each child's first initial.  


The girls and I enjoyed sharing a lesson with their friends.  As much as we love our daily lessons, just the three of us, sharing a weekly storytime with friends is wonderful!


Marla is a former special education teacher, PhD student, and stay-at-home, homeschooling mom of two little girls (ages 1 and 3).  She blogs about homeschooling at Marla's Motherhood Musings and her family's experiences living in Zambia at Our Life in Lusaka.

Thursday, September 29, 2011

Elements (Parts) of a Story


I found an activity that I thought would be neat to share with you. I believe I created this activity when I was in college, either for my Reading or Language Arts class. The activity combines art and literature, which will help those visual and tactile learners you have.

What you need:
Construction paper
Crayons
Glue
Markers
Pencil
Copy Paper

What you do:
Choose a picture book that your child really enjoys. First read the book with them. To meet the needs of those auditory learners, you can listen to it on CD.

Then, discuss the different parts of a story. There are five main parts of a story to focus on with young learners. You can include more or less, depending on the age of the learner. The five parts we are going to focus on are: characters, plot, setting, theme, and point of view.

The first thing you will need to do is define each part (element) of the story.

Characters: Characters are people or animals in the story.

Plot: Plot is the order of events involving characters in conflict situations

Setting: Setting is where and when a story takes place.

Theme: Theme is the meaning of the story, or the message the story conveys.

Point of View: Point of view tells whose eyes we are looking through when we hear the story.

After you have gone through the story with your child, you will illustrate each of the elements or parts of the story and create a book. For my project in college, I chose the book, Ira Sleeps Over by Bernard Waber. Below are some photographs of my project. I gave the book a cover and back and illustrated the elements of the story on white paper. I also included a title page within the book. I am not really a great artist, but you get the idea. For some of your little budding artists, this might be a project they want to do again and again. To give more emphasis to what they have learned, your children might define the parts of the story in their created book, and then on the following page, demonstrate by writing and illustrating how that part of the story is found in their book.


Note: Some of the websites I have researched to look up more helpful info for you include only characters, plot and setting as the three main parts of a story. My opinion on that is theme and point of view might be a little too abstract for younger minds. You can always modify this to teach younger children. For example, you might create a book that focus on just characters, plot and setting, or just one to focus on characters only.

To learn more about elements, or parts, of a story, or to get more ideas how to teach elements of a story, visit Teacher Vision/Story Elements.

What are some of your favorite picture books you might choose to use for this activity?
Related Posts Plugin for WordPress, Blogger...